Showing posts with label Word. Show all posts

Friday, January 25, 2008

Brochure Template

A frequent customer request is assistance in setting up a brochure. Unfortunately, our computers did not have a brochure template. Having this template would have made life a lot easier. Instead, I created instructions on converting a normal Word document into a brochure.

I recently had a eureka moment and realized that we could upload a brochure template to our own servers, thereby making the template available to all via the Web.

I will eventually find a place on the public website for this link, but for the time being, you can access a brochure template here. When asked whether or not you want to "Open" or "Save" the document, you should select "Save" and save it to the customers floppy disk or flash drive. Then you can open it.

Friday, November 30, 2007

Using Word to Create Labels

I have added a page to the MPLIC-Wiki for instructions on basic label-making in Word.

I have had a few questions regarding Word labels today. Since it is holiday time, many of you are preparing your holiday cards for other agencies and you want your labels to look nice and pretty.

Using Word labels is also quite handy at all times of the year whether you are helping customers or creating your own office labels. (NOTE: Customers can use our computers to create and save the Word label document. However, they cannot insert label sheets into our printers. They would need to take the document elsewhere to print.)

Thursday, February 15, 2007

What Do "Broken Printers" and MisGuided Zoom Settings Have In Common?

I was working this past Sunday when a customer approached me saying, "Your printer is not working right."

Hmmm. After some clarification, she explained that she had been increasing the font-size of her Word document but the printer kept printing her document in the original smaller-size font. I asked to look at her document, so we went to her computer and sure enough, the words in her document were very large on the screen.

I instantly knew what happened, and if you have taken the What's Wrong With My Document? class, you may know what had happened as well. View the prensentation below to find out what happened and how to fix it.

Wednesday, December 20, 2006

Making Brochures with MS Word

While this has been covered in several training sessions and has been available on a staff training document, I transferred this set of instructions to the SlideShare tool I have been using.

You will see why some time soon.

Wednesday, November 15, 2006

Formatting MS Word Templates with Styles

I have written about Resume Template Styles before, but this is a hard concept to understand through text alone. Therefore, I made this quick visual description:

Wednesday, July 19, 2006

Using Watermarks in Word

Someone recently asked how they could add the word "DRAFT" behind their text on their Word document. Technically speaking, they wanted to add a watermark to their document.

To add a watermark:

  1. Click on the Format menu.
  2. Point to Background and a menu will appear.
  3. At the bottom of the menu, you will see Printed Watermark. . . Click on it and a separate dialog box will appear.
  4. You have three radio buttons (1. No watermark; 2. Picture watermark; 3. Text watermark). To add text, click on Text watermark.
  5. Use the dropdown menu to select the word(s) you want to use as your watermark (ex. Draft, Top Secret, etc.).
  6. Click OK.

Thursday, June 22, 2006

Using the Mouse to Move Text with Word

You can use your mouse to move text in Word. This is an alternative to copy/cut and paste. This is a good thing but mostly a bad thing. I will explain.

  • To move text with your mouse, first highlight the text you want to move.
  • Then click and drag the text to the location you want to move it to. The text will relocate.
  • Or, click and drag while holding the CTRL key and the text will be copied to the new location (instead of cut).

The benefit of this is that if you have a need to cut/copy and paste quite a bit, it could save you a lot of time. The downside of this is the fact that many of our customers (and staff) will accidentally move text without realizing what they are doing. Next thing they know, their document is completely clustered.

Usually by the time a customer will ask us for help, they have attempted to fix their document numerous times, each time making their document worse. So, what do we do to solve this problem? Why is this useful for you to know? Here are some possible scenarios that would follow a customer explaining to library staff that their text just "magically" moved across the page.

A) Throw our hands in the air and commiserate with the customer about "those darn crazy computers".

B) Say that you are not a computer expert and that you will go find the library staff member that can maybe help them.

C) Explain that Word has a built-in editing feature that allows you to move highlighted text around the document if you click and drag; however, it mainly causes problems because of situations exactly like this. Show them the Undo button, fix their problem, and say that if it happens again, just click the Undo button.

Which one of these scenarios would give the customer their best experience at the library?

Monday, June 12, 2006

Restart Numbering in MS Word

I often utilize the numbering tool in MS Word. This is the tool found on the Formatting toolbar that automatically creates a numbered list for you. Every time you hit the Enter key, a new number is created.

One quirk of this tool is the habit MS Word has of continuing a numbered list. In other words, if you are creating two numbered lists, Word may begin the second numbered list where the first one left off: (follow me here)

1. For example, . . .
2. If I am creating a numbered list, . . .
3. and then I end a numbered list. . .

. . .to continue typing, the next time a create a numbered list, the first number may be a 4, not a 1.

If that ever happens to you, no fear:

  • Make sure your cursor is somewhere in the numbered list you need to fix.
  • Click on Format on the menu bar.
  • Click on Bullets and Numbering.
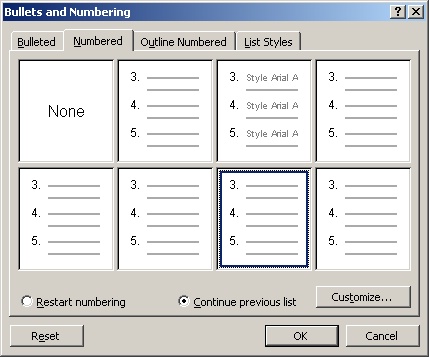
  • The dialog box below will appear. Towards the bottom, you will see two radio buttons. One says Continue previous list. The other says Restart numbering.
  • Click on Restart numbering and click on OK. You should be set!


See video description.


Bullets and Numbering

Monday, April 10, 2006

Do your Resume Templates in Style


In the Library Computers class, we learned that Resume Templates are just tables, and that the best way to add and delete information in the table is to use the Table menu to add or delete rows.

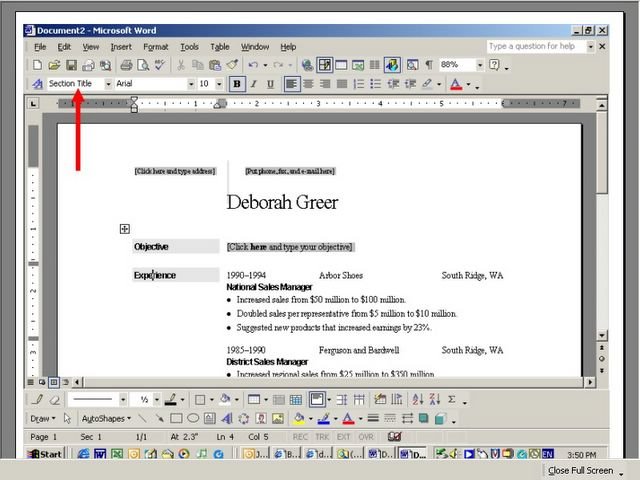
Well, here is another great secret to Resume Templates in Word. The templates have built-in Styles that can be accessed via the Style drop down menu (pictured) which is located on the Formatting toolbar.

The picture here is showing the Elegant Resume Template. If you click on Objective, Experience, or any of the other section headers, you will notice that the Style drop down menu will say Section Title. Now, click on one of the lines that lists the years, name of company, and city. Now look at the Style drop down menu. Notice it says Company Name. Now click on one of the bulleted lists. The Style drop down menu now says Achievement.

Those are the built-in Styles. Therefore, if you are adding a new section header, just insert a row, and rather than attempting to reproduce the other section headers, just click on the Style drop down menu and select the Section Title Style. Or, if you have inserted a new row to add information about an additional company, change the Style to Company Name. Notice that the tabs and spacing are automatically added to the Ruler.

NOTE: If you press the Tab key in a table, you will be moved to the next cell. THEREFORE, to utilize an inserted tab, you must press CTRL+Tab.

Thursday, March 02, 2006

Word: Page Border Printing Problems

Someone recently asked this question: Whenever I add a page border in Microsoft Word, the printer always cuts off the bottom border. How can I avoid that?

Well, I did some research and found out the best way to avoid that problem.

  1. Go to File>Page Setup. A dialog box will appear that consists of three tabs (Margins, Paper, and Layout).
  2. Click on the Paper tab.
  3. You will notice that the paper size is 8 1/2" X 11".
  4. Change the paper height to 10.8" or less if needed.

Your page border will now appear when you print. Basically, you told Word that your page is shorter than 11" so the border moves up into the printable area.

Here is a link to Microsoft's suggestions.

Monday, February 20, 2006

Word: The Reviewing Toolbar for the Editors in All of Us

Have you ever co-created a document with a group of people? Chances are, you needed to email the document back and forth to numerous people. Perhaps you wanted to add some comments but found it time consuming and confusing (ex. "I would make this change in the middle of the second paragraph, the sentence that starts with. . .).

Try the Reviewing Toolbar available in MS Word the next time this occurs. To access this toolbar, click on View on the Menu Bar. Then point to Toolbars. A menu of available toolbars will appear. Click on Reviewing.

This allows you to add comments to the actual document. Would you phrase a sentence differently. Highlight the sentence. Click on the New Comment button and type away.

When the originator of the document receives your comments, they can use the Reviewing toolbar to either reject or accept the change. If they accept, the document is automatically updated. No need to retype!

Thursday, February 16, 2006

Word: Format Picture

Here are some tips to help you with customers who have inserted pictures into their Microsoft Word documents:

Double-click on the picture to bring up the Format Picture dialog box. This box has three important tabs.

The first is called Colors and Lines. Use it to add a frame (or Line) to the picture. Choose the color of the Line and then select the Weight. The higher the Weight, the bigger the Line will be (option only available when wrapping style is not "In Line with Text" (see below)).

Use the Size tab to make the picture bigger or smaller. The ratio should be locked so that when you change the Height, the Width will automatically adjust and vice versa.

And use the Layout tab to select the Wrapping Style (how the text wraps around the picture). In Line with Text will treat the picture like any other letter. Square and Tight will have the text wrap around the picture like you see in a newspaper or book. Or you can lay the picture Behind Text or In Front of Text.

Word: AutoText It!

Tired of typing “Memphis Public Library & Information Center” over and over again? In Microsoft Word, all you need to do is add it to your AutoText. If you are typing in Word and you type a day of the week or a month, you will notice that Word will suggest the word before you finish typing.

For example, when I type January, all I have to type is “Janu” before Word suggests “January”. Then I just hit enter and Word automatically finishes the word for me. That is called AutoText.

You can add your own words or phrases to the AutoText list.

1) Click on “Insert” in the Menu Bar.
2) Point at “AutoText” and another Menu will appear.
3) Click on the “AutoText” in that separate menu.
4) Type whatever word or phrase you want.
5) Click “Add”.

Now, all I have to type is “Memp” to pull up the AutoText suggestion of “Memphis Public Library & Information Center”, thereby saving me 39 keystrokes. Add many of your regularly used words or phrases and your typing time will diminish significantly.